.svg)
With tickets, you can keep track of your customer interactions as they progress over time. The tickets tool includes a default Support pipeline that you can use to manage your ticket statuses.
Create a new ticket pipeline
Please note: only users in accounts with Service Hub Starter, Professional, or Enterprise subscriptions can create additional ticket pipelines. Learn more about the maximum number of ticket pipelines available for your subscription.
- In your HubSpot account, click the settings settings icon in the main navigation bar.
- In the left sidebar menu, navigate to Objects > Tickets.
- Click the Pipelines tab.
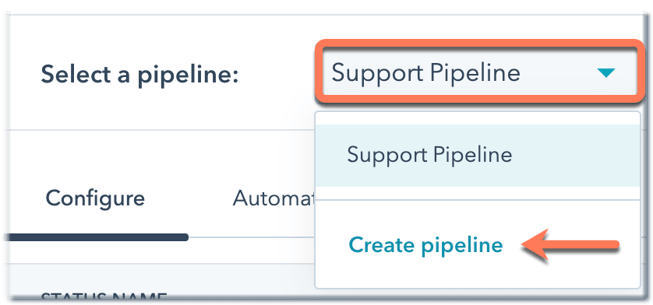
- Click the Select a pipeline dropdown menu, then select Create pipeline.
- In the dialog box, enter a Pipeline name and click Create.
Edit or delete ticket pipelines
You can rename your pipeline or if you have multiple ticket pipelines, you can reorder and delete them. Users in an account with a Service Hub Professional or Enterprise subscription can also manage who has access to a pipeline.
- In your HubSpot account, click the settings settings icon in the main navigation bar.
- In the left sidebar menu, navigate to Objects > Tickets.
- Click the Pipelines tab.
- Click the Select a pipeline dropdown menu, then select a pipeline.
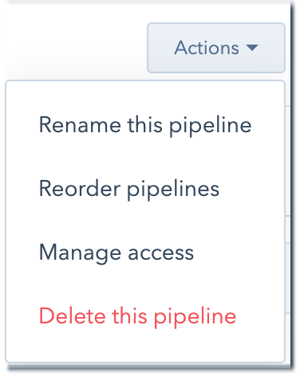
- On the right, click the Actions dropdown menu and select one of the following:
- Rename this pipeline: change the pipeline’s name. In the dialog box, enter the new name, then click Rename.
- Reorder pipelines: change the order of your pipelines. In the pop-up box, click a pipeline and drag it to a new position. When all pipelines are in the desired order, click Save.
- Manage access: if you're a super admin, manage which users can view and edit the pipeline (Service Hub Professional or Enterprise only).
- Delete this pipeline: delete the pipeline. You can't delete a pipeline if it contains tickets. You'll need to delete or move tickets to another pipeline before deleting the pipeline.
- Click Customize ticket cards to select the properties that are displayed on board cards for the pipeline.
Customize ticket statuses and ticket status properties
You can edit the statuses within a pipeline, as well as customize the properties that appear for a ticket based on its status.
Please note: you must have permissions to edit property settings to customize ticket properties.
-
In your HubSpot account, click the settings settings icon in the main navigation bar.
-
In the left sidebar menu, navigate to Objects > Tickets.
-
Click the Pipelines tab.
-
Click the Select a pipeline dropdown menu, then select a pipeline to edit.
-
To add a new ticket status:
-
Under the existing ticket statuses, click + Add another status.
-
Enter a ticket status name, then click the dropdown menu in the Open or closed column and select if the ticket status should set a ticket as Open or Closed. There must be at least one Open and one Closed status.
-
-
To reorder a ticket status, click the ticket status and drag it to a new position.
- To view the internal name for a ticket status, hover over the status and click the code code icon. The internal name is used by integrations and the API.
-
To delete a ticket status, hover over a status and click Delete.
-
To customize the ticket properties presented to users when a ticket moves to a specific status:
-
-
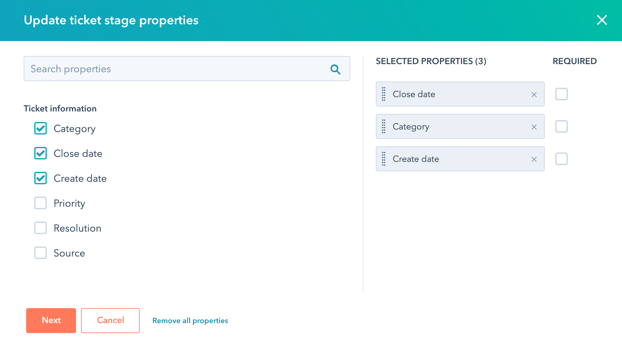
In the row of the status, hover over the Update status properties column and click Edit properties.
-
In the dialog box, select the checkboxes next to any new properties you want to appear.
-
To require a value for a property, select the checkbox in the Required column (Starter, Professional or Enterprise only). When a property is required, users won’t be able to create a ticket in that status unless they enter a value for that property.
-
To reorder the properties, click and drag them to a new position.
- To remove a selected property, click the X next to that property in the Selected Properties column.
- Once you've selected your properties, click Next. The properties you've selected will automatically appear when manually creating a new ticket in that status.
-
- Once you've finished editing your statuses, in the bottom left, click Save.
Learn how to customize the properties that appear on ticket cards in board view.
Automate ticket status and actions (Service Hub Starter, Professional, and Enterprise only)
Users in accounts with Service Hub Starter, Professional, and Enterprise subscriptions can automate ticket status and certain actions within a pipeline's settings. For ticket automation beyond the options below, users in Service Hub Professional or Enterprise accounts can create ticket-based workflows with more advanced actions.
In your pipeline settings, you can set up ticket status automation. For example, you can create tickets for new email conversations, or edit an existing ticket status when a new email is sent or received.
- In your HubSpot account, click the settings settings icon in the main navigation bar.
- In the left sidebar menu, navigate to Objects > Tickets.
- Click the Pipelines tab.
- Click the Select a pipeline dropdown menu, then select the ticket pipeline you want to automate.
- Click the Automate tab.
- You can review and edit the following settings:
- Connected channels: a ticket will be created for all new incoming messages sent to the listed channels. Ticket automation will apply to these tickets. If you don't want a ticket created for messages sent to a channel, click the channel name to turn ticket automation off in the channel's settings.
- Update ticket status: a ticket’s status will be updated by one of the default triggers:
- An email is sent to a customer: the ticket status will change when a user sends an email to a contact from the ticket record. Emails sent from the contact record will not trigger a ticket status change.
- A customer replies to an email: the ticket status will change when a customer replies to the same thread the ticket was created on. If the ticket was closed and then reopened, any new threads on the ticket will also update the ticket status. The ticket status will not change for the following scenarios: forwarded emails, replies to forwarded emails, other emails sent by the contact, or replies sent from a user's connected personal email.
- To turn off a trigger, clear the checkbox to the left of the trigger’s name.
- To edit the action, hover over the table and click Edit action. In the right panel, click the Select status dropdown menu and select a status, then click Save.

-
- Service Hub Professional and Enterprise users with workflow permissions can hover over the table and click View workflow to review the automation in the workflow editor.
You can also automate ticket actions within a specific pipeline. For example, you can send an automated email from the conversations inbox when a ticket is received or closed, or send an internal notification to a team member when a ticket status changes.
- On the Automate tab, click Additional status automation to expand more automation settings.
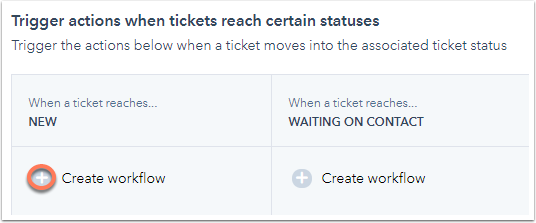
- In the Trigger actions when a ticket reaches a certain status section, click the plus icon to automate actions for each ticket status.
- To send an email when a ticket is opened or closed, select Send email in the right panel. In the Select an email section, select Ticket received or Ticket closed to choose a HubSpot-created email template. You can click the name of the email to view and edit the template. If your account has a Marketing Hub Professional or Enterprise subscription, you can also select a custom automated email. Once the email is sent, you'll be notified in your conversations inbox with a link and timestamp.
Please note: the default Ticket received and Ticket closed emails are transactional emails created by HubSpot. Transactional emails are used for relationship-based interactions, such as a confirmation email following a purchase. Contacts do not need to be set as marketing to be sent a transactional email. If you select to send a non-transactional automated email instead, contacts do need to be set as marketing to receive the email. If your account has the transactional email add-on, learn how to create custom transactional emails.

- To send an internal notification to your team when a ticket reaches a certain status, select Send internal email notification in the right panel. You can choose to send this notification to a specific user, team, or owner.
- To manage an existing workflow action, at the top right of the action bubble, click the Actions dropdown menu:
- To leave a comment for other users in the account, select Comment. Type your reply and click Save.
- To edit the details of the action, select Edit. In the right panel, update the information and click Save.
- To delete an action, hover over the Delete option. Select This action to delete only the selected action or select This action and all after it to delete the selected action and any actions following it.
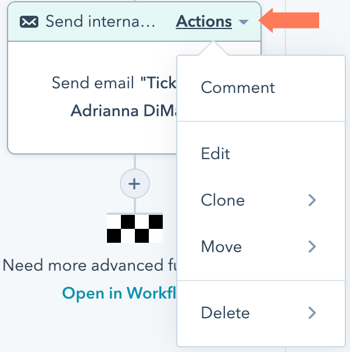
- If you have an account with a Service Hub Professional or Enterprise subscription, you can also add other ticket-based workflow actions here, including the options to Clone or Move actions. Click Open in Workflows to navigate to the workflow builder where you can add additional actions and edit the workflow's settings. Workflows created from the ticket settings will appear in the Created in other tools tab in the workflows dashboard.

- Click Save.